Lateral Movement Using Outlook’s CreateObject Method and DotNetToJScript

In the past, I have blogged about various methods of lateral movement via the Distributed Component Object Model (DCOM) in Windows. This typically involves identifying a DCOM application that has an exposed method allowing for arbitrary code execution. In this example, I’m going to cover Outlook’s CreateObject() method.

If you aren’t familiar with CreateObject(), it essentially allows you to instantiate an arbitrary COM object. The issue with abusing DCOM applications for lateral movement is that you are normally at the mercy of the method being used. The majority of the talked about techniques involve abusing a ShellExecute (or similar) method to start an arbitrary process or opening a malicious file on the target host, which requires placing a payload on disk (or a network share). While these techniques work great, they aren’t ideal from a safety perspective.

For example, the ShellBrowser/ShellBrowserWindow applications only allow you to start a process with parameters, which makes the technique susceptible to command line logging. What about the Run() methods for macro execution? Well, that requires the document with the malicious macro to be local or hosted on a share (not exactly ideal).

What if we could get direct shellcode execution via DCOM and not have to worry about files on the target or arbitrary processes such as powershell or regsvr32? Luckily, Outlook is exposed via DCOM and has us covered.

First, we need to instantiate Outlook remotely:
$com = [Type]::GetTypeFromProgID('Outlook.Application’,’192.168.99.152’)
$object = [System.Activator]::CreateInstance($com)

After doing so, you will have the CreateObject() method available to you:


As discussed above, this method provides the ability to instantiate any COM object on the remote host. How might this be abused for shellcode execution? Using the CreateObject method, we can instantiate the ScriptControl COM object, which allows you to execute arbitrary VBScript or JScript via the AddCode() method:

$RemoteScriptControl = $object.CreateObject(“ScriptControl”)

If we use James Forshaw’s DotNetToJScript technique to deserialize a .NET assembly in VBScript/JScript, we can achieve shellcode execution via the ScriptControl object by passing the VBScript/JScript code to the AddCode() method. Since the ScriptControl object was instantiated remotely via Outlook’s CreateObject() method, any code passed will be executed on the remote host. To demonstrate this, I will use a simple assembly that starts calc. The PoC C# looks something like this:

Note: Since it is just C#, this can be a full shellcode runner as well 🙂

After compiling the “payload”, you can pass it to DotNetToJScript and get back some beautiful JScript/VBScript. In this instance, it will be JScript.

Now that the payload has been generated, it can be passed to the ScriptControl COM object that was created via Outlook’s CreateObject method on the remote host. This can be accomplished by storing the entire JScript/VBScript code block into a variable in PowerShell. In this case, I have stored it in a variable called “$code”:

Finally, all that needs done is to set the “Language” property on the ScriptControl object to whatever language that will be executed (JScript or VBScript) and then call the “AddCode()” method with the “$code” variable as a parameter:

$RemoteScriptControl.Language = “JScript”
$RemoteScriptControl.AddCode($code)

After the “AddCode()” method is invoked, the supplied JScript will execute on the remote host:

As you can see above, calc.exe has spawned on the remote host.

Detections and Mitigations:

You might have noticed in the above screenshot that Outlook.exe spawned as a child of svchost.exe. That is indicative of Outlook.Application being instantiated via DCOM remotely, so that should stick out. In most cases, the process being started will contain “-embedding” in the command line, which is also indicative of remote instantiation.

Additionally, module loads of vbscript.dll or jscript/jscript9.dll should stand out as well. Normally, Outlook does not load these and those being loaded would be indicators of the ScriptControl object being used.

In this example, the payload was running as a child process of Outlook.exe, which would be weird. It is important to remember that ultimately, a .NET assembly is being executed, meaning that shellcode injection is absolutely doable. Instead of simply starting a process, an attacker can write an assembly that injects shellcode into another process, which would bypass the parent-child relationship detection. Ultimately, enabling the Windows Firewall will prevent this attack as it stops DCOM usage.

-Matt N

A Look at CVE-2017-8715: Bypassing CVE-2017-0218 using PowerShell Module Manifests

Recently, Matt Graeber (@mattifestation) and I have been digging into methods to bypass User Mode Code Integrity (UMCI) in the context of Device Guard. As a result, many CVEs have been released and Microsoft has done a good job at mitigating the attack surface that PowerShell imposes on UMCI by way of continuing to improve Constrained Language Mode (CLM) – the primary PowerShell policy enforcement mechanism for Device Guard and AppLocker. The following mitigations significantly reduce the attack surface, and were a result of CVE-2017-0218.

The vast majority of these injection bugs abuse Microsoft-signed PowerShell scripts or modules that contain functionality to run unsigned code. This ranges all the way from calling Invoke-Expression on a parameter to custom implementations of PowerShell’s Add-Type cmdlet. Microsoft-signed PowerShell code is targeted because an AppLocker or Device Guard policy that permits Microsoft code to execute will execute in Full Language Mode – i.e. with no restrictions placed on what code can be executed.

To fully understand the fix, let’s examine the behavior before the patch. The gist of this bug is that an attacker can use functions within a Microsoft-signed PowerShell script to bypass UMCI. To demonstrate this, let’s look at the script “utils_SetupEnv.ps1”, a component of Windows Troubleshooting Packs contained within C:\Windows\diagnostics. This particular script has a function called “import-cs”. This function simply takes C# code and calls Add-Type on it (note: Add-Type is blocked in constrained language mode). Since the script is Microsoft-signed, it executes in Full Language mode, allowing an attacker to execute arbitrary C#.

As you can see above, we imported “utils_SetupEnv.ps1”, which exposed the “import-cs” function to us. Using that function, we can pass it our own C# which gets executed, bypassing constrained language mode. The above bug was issued CVE-2017-0218 and fixed.

In response to bugs like the one above, Microsoft imposed a few additional restrictions when running in PowerShell’s Constrained Language Mode. The first one is that you are no longer allowed to import PowerShell scripts (.PS1s) via Import-Module or other means. If you try to import a script in CLM, you will see something like this:

One possible workaround would be to rename a PowerShell script (.PS1) to a module file (.PSM1) and import it that way, right? Well, that is where the second mitigation comes in.

Microsoft introduced a restriction on what you can import and use via PowerShell modules (.PSM1s). This was done with “Export-ModuleMember”; if you aren’t familiar with Export-ModuleMember, it defines what functions in a module are able to be used once its imported. In Constrained Language Mode, a module’s function has to be exported via Export-ModuleMember in order for it to be available. This significantly reduces the attack surface of functions to abuse in Microsoft signed PowerShell modules. It’s also just good practice in general to explicitly define what functions you want to expose to users of your module.

If we rename “utils_SetupEnv.ps1” to “utils_SetupEnv.psm1” and try to import it, it will appear to import successfully. You will notice that the “import-cs” function we used earlier isn’t recognized. This is because “import-cs” is not exposed via Export-ModuleMember.

If we look at a valid PowerShell module file, the Export-ModuleMember definition will look something like this:

What that essentially means is that only “Export-ODataEndpointProxy” can be used when the module is imported. This severely limits the abuse potential for Microsoft-signed PowerShell scripts that contain functions that can be abused to run unsigned code as most of them won’t be exposed. Again, the PowerShell team is slowly but surely mitigating many of the bypass primitives we use to circumvent Constrained Language Mode.

After investigating that fix, I discovered and reported a way around the Export-ModuleMember addition, which was assigned CVE-2017-8715 and fixed in the October Patch Tuesday release. This bypass abuses a PowerShell Module Manifest (.PSD1). When investigating the implications of these files, I realized that you could configure module behavior via these files, and that they weren’t subject to the same signing requirements that many of the other PowerShell files are (likely since PSD1 files don’t contain executable code). Despite that, PSD1s can still be signed.

If we go back to the “utils_SetupEnv.ps1” script, the “import-cs” function is no longer available since no functions from that script are exposed via Export-ModuleMember. To get around this, we can rename “utils_SetupEnv.ps1” to “utils_SetupEnv.psm1” so we can import it. After doing so, we can drop a corresponding module manifest for “utils_SetupEnv.psm1” that exports the beloved “import-cs” function for us. This module manifest will look something like this:

As you can see, we have set “import-cs” as a function to export via “FunctionsToExport”. This will export the function just as Export-ModuleMember would have. Since PowerShell module manifest files were not constrained to the same code signing requirements as other PowerShell files, we can simply create our own for the actual Microsoft signed script we want to abuse. After dropping the above manifest for the “utils_SetupEnv” PowerShell module, we can now use the “import-cs” function to execute arbitrary C# code, despite the newly introduced .PS1 import and Export-ModuleMember mitigation.

As I mentioned above, this bypass was issued CVE-2017-8715. The fix involved subjecting PowerShell module manifest files (.PSD1s) to the same code signing requirements as all the other files in a module in that if a module is signed and permitted by Device Guard or AppLocker policy, then a module manifest will only be honored if it is also signed pursuant to a whitelist rule. Doing so will prevent an attacker from modifying an existing manifest or using their own.

As always, report any UMCI bypasses to MSRC for CVEs 🙂

-Matt N.

UMCI Bypass Using PSWorkFlowUtility: CVE-2017-0215

When looking for User Mode Code Integrity (UMCI) bypasses in the context of Device Guard, my typical approach has been to hunt for Microsoft-signed PowerShell scripts/modules that contain some sort of functionality that allows for unsigned code execution. Fortunately, there are plenty that exist on Windows 10 by default. One such bypass was CVE-2017-0215, which abused the “PSWorkFlowUtility” PowerShell module to execute arbitrary unsigned PowerShell code.

You might ask, how? Looking at this module, you will notice that it has an embedded Authenticode signature block, which makes it portable (an attacker can bring the old, vulnerable version to their target as the certificate and file hash is included in the file). What else stands out to you?

We know that in the context of UMCI, the most locked down scenario is only allowing Microsoft signed code to run. Since this module is signed by Microsoft, it will be permitted to execute in Full Language Mode (as opposed to Constrained Language Mode). This particular module simply takes PowerShell code via a parameter (as a string) and continues to call “Invoke-Expression” on it, which simply executes it.

As you can see, taking the square root of Pi is blocked in Constrained Language Mode as method invocation on most .NET types are not permitted. If we import the PSWorkFlowUtility module and pass that code via the “-Expression” parameter, it will execute in Full Language Mode, giving us the result. To mitigate this, Microsoft fixed the built-in module by removing the authenticode signature and adding “[System.Security.SecurityCritical()]”, which makes the module security transparent and subject to Constrained Language Mode (CVE-2017-0215).

Since the old, vulnerable module file was Authenticode signed (making it portable), it is required to block the old, vulnerable version of this module. This can be done via the file’s hash, but it is essential that all previous, vulnerable versions of the file be accounted for – a responsibility that should honestly lie on Microsoft since they are able to collect the hashes across all Windows builds where the vulnerable module is present.

Another viable mitigation for blocking the old, vulnerable version is to note that the embedded signature is not Windows-signed (i.e. has the Windows System Component Verification EKU – 1.3.6.1.4.1.311.10.3.6). Device Guard CI policies permit limiting a publisher rule by a specific enhanced key usage (EKU). A stricter policy would allow only Windows-signed code to run – a rule that’s present in Matt Graeber’s Device Guard base reference policy. If only Windows-signed code is permitted to execute, the vulnerable version of Invoke-AsWorkflow would be limited to execution within constrained language mode, effectively mitigating the previous vulnerability. Now, vulnerable code can and will be Windows-signed but in this case, this vulnerability is effectively mitigated with a stronger Device Guard CI policy.


The old, vulnerable version of the module can be found here: https://gist.github.com/enigma0x3/dca6f24b2b94e120daae37505d209ecc


-Matt N.

Lateral Movement using Excel.Application and DCOM

Back in January, I put out two blog posts on using DCOM for lateral movement; one using MMC20.Application and the other outlining two other DCOM applications that expose “ShellExecute” methods. While most techniques have one execution method (WMI has the Create() method, psexec creates a service with a custom binpath, etc.), DCOM allows you to use different objects that expose various methods. This allows an operator to pick and choose what they look like when they land on the remote host from a parent-child process relationship perspective.

In this post, I’m going to walk through abusing the Excel.Application DCOM application to execute arbitrary code on a remote host. This same DCOM application was recently talked about for lateral movement by using the RegisterXLL method, which you can read about here. In this post, I’m going to focus on the “Run()” method. In short, this method allows you to execute a named macro in a specified Excel document. You can probably see where I’m going with this 🙂

As you all may know, VBA macros have long been a favorite technique for attackers. Normally, VBA abuse involves a phishing email with an Office document containing a macro, along with enticing text to trick the user into enabling that malicious macro. The difference here is that we are using macros for pivoting and not initial access. Due to this, Office Macro security settings are not something we need to worry about. Our malicious macro will execute regardless.

At this point, we know that Excel.Application is exposed via DCOM. By using OLEViewDotNet by James Forshaw (@tiraniddo), we can see that there are no explicit launch or access permissions set:

If a DCOM application has no explicit Launch or Access permissions, Windows allows users of the Local Administrator group to Launch and Access the application remotely. This is because DCOM applications have a “Default” set of Launch and Access permissions. If no explicit permissions are assigned, the Default set is used. This can be found in dcomcnfg.exe and will look like this:

Since Local Administrators are able to remotely interface with Excel.Application, we can then remotely instantiate it via PowerShell using [Activator]::CreateInstance():

As you can see, remote instantiation succeeded. We now have the ability to interact with Excel remotely. Next, we need to move our payload over to the remote host. This will be an Excel document that contains our malicious macro. Since VBA allows Win32 API access, the possibilities are endless for various shellcode runners. For this example, we will just use shellcode that starts calc.exe. If you are curious, you can find an example here.

Just create a new macro, name it whatever you want, add in your code and then save it. In this instance, my macro name is “MyMacro” and I am saving the file in the .xls format.

With the actual payload created, the next step is to copy that file over to the target host. Since we are using this technique for Lateral Movement, we need Local Admin rights on the target host. Since we have that, we can just copy the file over:

With the payload on target, we just need to execute it. This can be done using the Run() method of the Excel.Application DCOM application that was instantiated earlier. Before we can actually call that method, the application needs to know what Excel file the macro resides in. This can be accomplished using the “Workbooks.Open()” method. This method just takes the local path of the file. So, what happens if we invoke the method and pass the location of the file we just copied?

Well, isn’t that interesting. The file exists, but Excel.Application is stating that it doesn’t. Why might this be? When Excel.Application is instantiated via DCOM, it is actually instantiated via the Local System identity. The Local System user, by default, does not have a profile. Since Excel assumes that it is in an interactive user session, it fails in a less than graceful way. How can we fix this? There are better ways to do this, but a quick solution is to remotely create the Local System profile.

The path for this profile will be: C:\Windows\System32\config\systemprofile\Desktop and C:\Windows\SysWOW64\config\systemprofile\Desktop.

Now that the Local System profile is created, we need to re-instantiate the Excel.Application object and then call “Workbooks.Open()” again:

As you can see, we were now able to open the workbook containing our malicious macro. At this point, all we need to do is call the “Run()” method and pass it the name of our malicious macro. If you remember from above, I named mine “MyMacro”

Calling “Run(myMacro)” will cause the VBA in that macro to execute. To verify this, we can open Process Explorer on the remote host and verify. As you can see below, this particular host has the “Disable VBA for Office Applications” GPO set. Regardless of that security setting, the macro is permitted to execute:

For this example, I just used calc spawning shellcode, which resulted in a child process being spawned under Excel.exe. Keep in mind that since VBA offers a lot in terms of interaction with the OS, it is possible to not spawn a child process and just inject into another process instead. The final steps would be to remotely cleanup the Excel object and delete the payload off the target host.

I have automated this technique via PowerShell, which you can find here: https://gist.github.com/enigma0x3/8d0cabdb8d49084cdcf03ad89454798b

To assist in mitigating this vector, you could manually apply remote Launch and Access permissions to the Excel.Application object…but don’t forget to look at all the other Office applications. Another option would be to change the default remote Launch/Access DACLs via dcomcnfg.exe. Keep in mind that any DACL changes should be tested as such modifications could potentially impact legitimate usage.  In addition to that, enabling the Windows Firewall and reducing the number of Local Administrators on a host are also valid mitigation steps.

What stands out the most with this technique is that Excel and the child process will spawn as the invoking user. This will often be process creations from user accounts that different than the user that is currently logged on. If those are the only two processes and the user account being used doesn’t normally logon to that host, that might be a red flag.

-Matt N.

UMCI vs Internet Explorer: Exploring CVE-2017-8625

In the recent months, I have spent some time digging into Device Guard and how User Mode Code Integrity (UMCI) is implemented. If you aren’t familiar with Device Guard, you can read more about it here. Normally, UMCI prevents unapproved binaries from executing, restricts the Windows Scripting Host, and places PowerShell in Constrained Language mode. This makes obtaining code execution on a system fairly challenging. This post is going to highlight bypassing User Mode Code Integrity to instantiate objects that are normally blocked.

This bug was fixed in the August 2017 Patch Tuesday release under CVE-2017-8625. The patch fixed two different techniques as both of them abuse the fact that MSHTML isn’t enlightened. The other technique abused Microsoft Compiled HTML Help files (CHMs). This was blogged about by @Oddvarmoe and you can read more about that here: https://msitpros.com/?p=3909

As I mentioned above, the root cause of the bug was that MSHTML wasn’t enlightened in the context of UMCI. This essentially means that Device Guard’s UMCI component didn’t restrict MSHTML and simply let it execute everything with assumed “Full Trust.” Due to this, Internet Explorer permitted loading restricted objects. How, you might ask? The answer lies with Internet Explorer’s ability to interface with ActiveX and COM components =)

For example, the below HTML file will use a script tag to run some JScript. UMCI normally blocks instantiation of this object (and just about every other one). As a PoC, I just instantiated WScript.Shell and invoked the “Run” method to demonstrate I could instantiate a blocked object and invoke one of its methods.

As you can see below, “WScript.Shell” was blocked from instantiating via UMCI. Immediately following that, we instantiate “WScript.Shell” again via the HTML file and then start “calc.exe” via the “Run” method:

Since MSHTML didn’t conform to the same restrictions as other OS components, the WScript.Shell object was permitted to load and the run method was freely accessible.

It should be noted that Internet Explorer does apply zone security to prevent automatic execution of ActiveX controls via HTML. When opened, the user will see two prompts, one from IE asking permission to enable the ActiveX content and another security warning alerting the user that the content might be malicious. If an attacker is on a system but doesn’t have unsigned code execution (see WMImplant), all it takes is two User Hive registry changes to temporarily disable the ActiveX alerting, allowing for silent unsigned code-execution. Those two changes look like this:

Most UMCI bypasses are serviceable bugs per Microsoft, so be sure to send those over to secure@microsoft.com if you like CVEs =)

With CVE-2017-8625 issued, ActiveX/COM controls are no longer able to be loaded as Internet Explorer is now enlightened. This hopefully makes MSHTML bypasses a bit harder to find =)

Disclosure timeline:

12/13/2016: Report submitted to secure@microsoft.com
03/2017: Fix was pushed into RS1 (Creators Update)
08/08/2017: RS1 fix was back ported; CVE-2017-8625 issued

-Matt N.

WSH Injection: A Case Study

At BSides Nashville 2017, Casey Smith (@SubTee) and I gave a talk titled Windows Operating System Archaeology. At this talk, we released a handful of offensive techniques that utilized the Component Object Model (COM) in Windows. One such technique described was abusing attacker controlled input passed to calls to GetObject(), which I will be discussing here.

Some environments use whitelisting to prevent unsigned Windows Scripting Host (WSH) files from running, especially with the rise of malicious .js or .vbs files. However, by “injecting” our malicious code into a Microsoft signed WSH script, we can bypass such a restriction.

Before diving into the different scripts that can be used for injection, it’s important to understand some of the mechanics behind why this works. When abusing injection, we are taking advantage of attacker controlled input passed to GetObject() and then combining that with the “script:” or “scriptlet:” COM monikers.

GetObject()

This method allows you to access an already instantiated COM object. If there isn’t an instance of the object already (if invoked without a moniker), this call will fail. For example, accessing Microsoft Excel’s COM object via GetObject() would look like this:

Set obj = GetObject( , "Excel.Application")

For the above to work, an instance of Excel has to be running. You can read more about GetObject() here

COM Monikers

While GetObject() is interesting by itself, it only allows us to access an instance of an already instantiated COM object. To get around this, we can implement a COM moniker to facilitate our payload execution. If you aren’t familiar with COM monikers, you can read more about them here. There are various COM monikers on Windows that allow you to instantiate objects in various ways. From an offensive standpoint, you can use these monikers to execute malicious code. That is a topic for another blog post :-).

For this post, we will focus on the “script:” and “scriptlet:” monikers. These particular monikers interface with scrobj.dll and help facilitate execution of COM scriptlets, which will be the payload. This was discovered by Casey Smith (@SubTee) and discussed at DerbyCon 2016 as well as blogged about here.

An example COM scriptlet will look like this:

<?XML version="1.0"?>
var r = new ActiveXObject("WScript.Shell").Run("calc.exe");
]]>
</scriptlet>

You can also use James Forshaw’s (@tiraniddo) tool DotNetToJScript to extend the JScript/VBScript in the COM Scriptlet, allowing for Win32 API access and even Shellcode execution. When you combine one of these two monikers and various calls to GetObject(), a lot of fun is had.

Now that the very brief COM background is over, time to look at an example 🙂

PubPrn.vbs

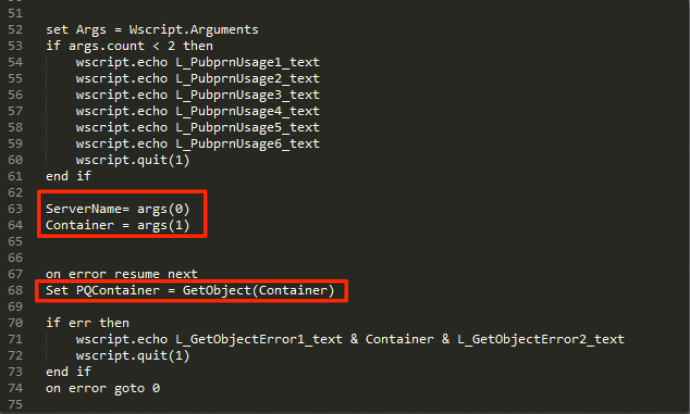
On Windows 7+, there is a Microsoft Signed WSH script called “PubPrn.vbs,” which resides in “C:\Windows\System32\Printing_Admin_Scripts\en-US”. When looking at this particular script, it becomes apparent that it is taking input provided by the user (via command line arguments) and passing an argument to “GetObject()”.

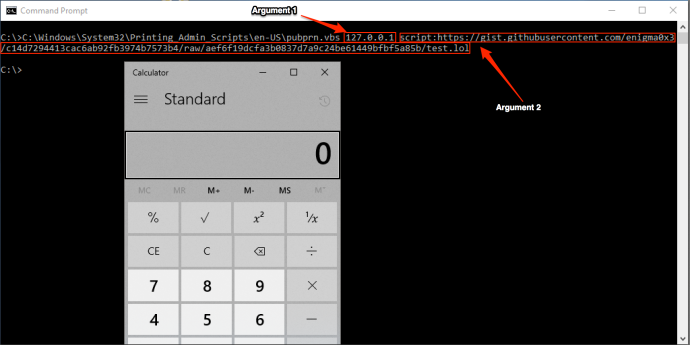
This means that we can run this script and pass it the two arguments it expects. The first argument can be anything and the second argument is the payload via the script: moniker.

Note: If you provide a value that isn’t a network address for the first argument (since it expects a ServerName), you can add the “/b” switch to cscript.exe when calling to suppress any additional error messages.

Since VBScript relies on COM to perform actions, it is used heavily in numerous Microsoft signed scripts. While this is just one example, there are bound to be others that can be exploited in a similar fashion. I encourage you to go hunting 🙂

  • Matt N.

Bypassing AMSI via COM Server Hijacking

Microsoft’s Antimalware Scan Interface (AMSI) was introduced in Windows 10 as a standard interface that provides the ability for AV engines to apply signatures to buffers both in memory and on disk. This gives AV products the ability to “hook” right before script interpretation, meaning that any obfuscation or encryption has gone through their respective deobfuscation and decryption routines. If desired, you can read more on AMSI here and here. This post will highlight a way to bypass AMSI by hijacking the AMSI COM server, analyze how Microsoft fixed it in build #16232 and then how to bypass that fix.

This issue was reported to Microsoft on May 3rd, and has been fixed as a Defense in Depth patch in build #16232.

To get started, this is what an AMSI test sample through PowerShell will look like when AMSI takes the exposed scriptblock and passes it to Defender to be analyzed:

As you can see, AMSI took the code and passed it along to be inspected before Invoke-Expression was called on it. Since the code was deemed malicious, it was prevented from executing.

That begs the question: how does this work? Looking at the exports of amsi.dll, you can see the various function calls that AMSI exports:

One thing that stood out to me immediately is amsi!DllGetClassObject and amsi!DllRegisterServer, as these are all COM entry points and used to facilitate instantiation of a COM object. Fortunately, COM servers are easy to hijack since medium integrity processes default to searching the current user registry hive (HKCU) for the COM server before looking in HKCR/HKLM.

Looking in IDA, we can see the COM Interface ID (IID) and ClassID (CLSID) being passed to CoCreateInstance():

We can verify this by looking at ProcMon:

What ends up happening is that AMSI’s scanning functionality appears to be implemented via its own COM server, which is exposed when the COM server is instantiated. When AMSI gets loaded up, it instantiates its COM component, which exposes methods such as amsi!AmsiOpenSession, amsi!AmsiScanBuffer, amsi!AmsiScanString and amsi!AmsiCloseSession. If we can force the COM instantiation to fail, AMSI will not have access to the methods it needs to scan malicious content.

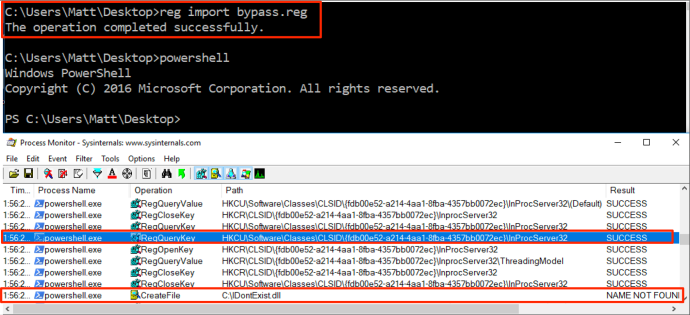
Since the COM server is resolved via the HKCU hive first, a normal user can hijack the InProcServer32 key and register a non-existent DLL (or a malicious one if you like code execution). In order to do this, there are two registry entries that need to be made:

When AMSI attempts to instantiate its COM component, it will query its registered CLSID and return a non-existent COM server. This causes a load failure and prevents any scanning methods from being accessed, ultimately rendering AMSI useless.

As you can see, importing the above registry change causes “C:\IDontExist” to be returned as the COM server:

Now, when we try to run our “malicious” AMSI test sample, you will notice that it is allowed to execute because AMSI is unable to access any of the scanning methods via its COM interface:

You can find the registry changes here:

https://gist.github.com/enigma0x3/00990303951942775ebb834d5502f1a6

Now that the bug is understood, we can go about looking at how Microsoft fixed it in build #16232. Since amsi.dll is AMSI’s COM server as well, diffing the two DLLs seemed like a good place to start. Looking at the diff, the AmsiInitialize function stood out as it likely contains logic to actually instantiate AMSI.

On the left, we have the old AMSI DLL and on the right, we have the newly updated AMSI DLL. As you can see, Microsoft appears to have removed the call to CoCreateInstance() and replaced it with a direct call to DllGetClassObject(). CoCreateInstance() can be defined as a high-level function used to instantiate COM objects that is implemented using CoGetClassObject(). After resolution finishes (partially via registry CLSID lookups) and the COM server is located, the server’s exported function “DllGetClassObject()” is called. By replacing CoCreateInstance with a direct call to amsi.dll’s DllGetClassObject() function, the registry resolution is avoided. Since AMSI is no longer querying the CLSID in the registry for the COM server, we are no longer able to hijack it.

Now that we know the fix, how do we go about bypassing it? Before proceeding, it is important to understand that this particular bug has been publicized and talked about since 2016. Essentially, scripting interpreters, such as PowerShell, load amsi.dll from the working directory instead of loading it from a safe path such as System32. Due to this, we can copy PowerShell.exe to a directory we can write to and bring back the vulnerable version of amsi.dll. At this point, we can either hijack the DLL off the bat, or we can create our same registry keys to hijack AMSI’s COM component. Since this vulnerable AMSI version still calls CoCreateInstance(), we can hijack the registry search order again.

First, we can verify that the patched amsi.dll version doesn’t query the COM server via the registry by creating a ProcMon filter for powershell.exe and AMSI’s CLSID. When PowerShell starts, you will notice no entries come up:

Next, we drop the vulnerable AMSI DLL and move PowerShell to the same directory. As you can see, it is now querying the registry to locate AMSI’s COM server:

With the vulnerable AMSI DLL back, we can now execute the COM server hijack:

Detection: Despite fixing this in build# 16232, it is still possible to execute this by executing a DLL hijack using the old, vulnerable AMSI DLL. For detection, it would be ideal to monitor (via command line logging, etc.) for any binaries (wscript, cscript, PowerShell) that are executed outside of their normal directories. Since the bypass to the fix requires moving the binary to a user writeable location, alerting on these executing in non-standard locations would catch this.

-Matt N.

Phishing Against Protected View

Microsoft Office has a security feature called Protected View. This feature opens an Office document that originates from the internet in a restricted manner. The idea is that it will prevent automatic exploitation of things such as OLE, Flash and ActiveX by restricting Office components that are allowed to execute. In 2016, Microsoft Patched a bug in Protected View around Excel Add-in files via CVE-2016-4117. @HaifeiLi has done some great research in this area, which you can read about here. MWR Labs also has a great white paper on understanding the Protected View Sandbox, which you can read about here. In this post, I will highlight some techniques you can employ to circumvent Protected View while still having access to the techniques us red teamers have grown to know and love. 

In my experience, end users are less likely to exit Protected View than they are to click through an Office dialogue box. I believe the reason for this is that they can access the document’s content while in Protected View, which is all they really need. When phishing, reducing the number of clicks for a user is always helpful. Protected View presents one additional click; if we can get rid of it, the better off we will be.

Full Disclosure: These were reported to MSRC on April 20th, 2017 and all of these have been deemed not a security issue. Features, not bugs 😉

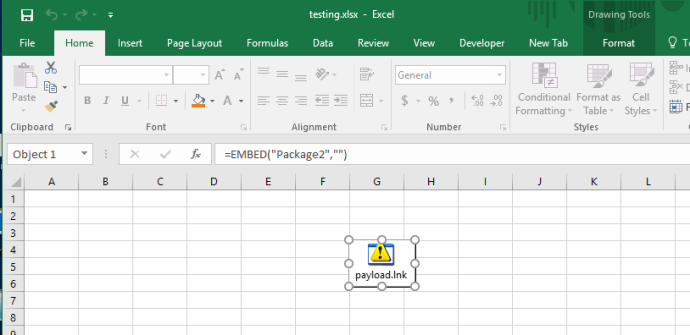
Before I get into these techniques, it’s important to understand the normal behavior. Attackers often use a number of tricks to get code-execution on a target system. This often ranges from Office macros, to OLE objects and Excel formula injection via DDE. If we embed a LNK into an Excel document via OLE, we will see this locally:


Now, if we host the above document, Protected View will activate and the embedded OLE object will not be able to activate via a double-click until Protected View is exited:

This is what should happen when a document comes in from the internet; things such as OLE, ActiveX and DDE should be blocked until “Enable Editing” is clicked.

Now that we know what normal Protected View behavior looks like, we can dive into some ways around it. The first one I want to cover is executing a file via OLE from a Publisher file. Like Word and Excel, Microsoft Publisher often comes with Microsoft Office and includes similar functionality, such as OLE embedding. Attackers often use LNK files embedded via OLE, so we will do the same in this example. Publisher offers many features to make the OLE object enticing to the user. For simplicity, I will not go into these features.

For this example, we will use a LNK payload that simply executes: “C:\Windows\System32\cmd.exe /c calc.exe”. I won’t go into embedding OLE inside Publisher either as it’s nearly identical to the other Office formats. If we host the Publisher file with the OLE embedded LNK, you will notice that Protected View does not activate. Clicking on the OLE object displays 1 prompt to the user:

Clicking “Open” will cause the LNK to execute:

As you can see, double clicking the OLE object resulted in the LNK being executed (after a “Open File” prompt). Normally, Protected View would have prevented the OLE object from being activated until the user explicitly exited it.

Next, we will go into OneNote. OneNote allows for attaching files to note files. LNK files look a bit weird when attached to OneNote, so we will use a VBScript instead. For this example, this VBScript file will simply execute calc.exe via the Run method of the WScript.Shell COM object. For simplicity, I won’t go into dressing the document up to entice the user.

If we host the OneNote file (.ONE) with the attached VBScript file, you will notice that Protected View does not activate. The user is presented with 1 dialogue:

Clicking “OK” will result in the VBScript being executed:


So far, we have Publisher files and OneNote files that don’t trigger Protected View, but allow for OLE embedding, or something similar. Finally, there are Excel Symbolic Link files. This file format somewhat restricts the content it can host. In my testing, SLK files will strip OLE objects and any existing macro when saved. Fortunately, there are still attacks like Excel Formula Injection via DDE. If you don’t know about this technique, you can read more about it here.

Normally, Protected View will prevent automatic cell updating, which renders this attack useless while in Protected View. If we add a malicious formula and save it as a Symbolic Link (.SLK) file, we can get around the Protected View portion of the attack.

In this example, the Excel formula will be something like this:

=cmd|‘ /C calc’!A0

It is important to note that the DDE injection attack does present the user with 2 security warnings. There may be additional functionality in Excel SLK outside of DDE that won’t prompt 2 security dialogues…I encourage you to use your imagination 🙂

If we save the file as a normal Excel file, you will notice that Protected View blocks the automatic “Enable” prompt, and requires the user to exit Protected View first:

Now, if we save the file as .SLK and host it, you will notice that Protected View is not activated, and the user is automatically presented with the “Enable, Disable” prompt. 

Clicking “Enable” will present the user with the following dialogue. I’ll be the first to say that users love to click “Yes” on this prompt 😉

Clicking “Yes” will result in the command being executed:

While the user is presented with 2 prompts for the .SLK attack, users are often less likely to exit Protected View then click on the displayed prompts. From a Red Team perspective, any way to get around Protected View is worth the investment in terms of payload delivery.

Prevention: I am not currently aware of a way to manually enroll Publisher, OneNote and .SLK files into Protected View. User awareness training is recommended. If your end users do not use OneNote and Publisher, one solution would be to uninstall these.

  • Matt N.

Defeating Device Guard: A look into CVE-2017-0007

Over the past few months, I have had the pleasure to work side-by-side with Matt Graeber (@mattifestation) and Casey Smith (@subtee) in their previous job roles, researching Device Guard user mode code integrity (UMCI) bypasses. If you aren’t familiar with Device Guard, you can read more about it here: https://technet.microsoft.com/en-us/itpro/windows/keep-secure/device-guard-deployment-guide.  In short, Device Guard UMCI prevents unapproved binaries from executing, restricts the Windows Scripting Host, and it places PowerShell in Constrained Language mode, unless the scripts themselves are signed by a trusted signer. After spending some time evaluating how scripts are handled on Device Guard enabled systems, I ended up identifying a way to get any unapproved script to execute on a Device Guard enabled system. Upon reporting the issue to MSRC, this bug was eventually assigned CVE-2017-0007 (under MS17-012) and patched. This particular bug only impacts PowerShell and the Windows Scripting Host, and not compiled code.

This bug is my first CVE and my first time reversing a patch. This post is a write-up of not only the bug, but the patch reverse-engineering process that I took as well. Since this is my first time doing this, there are bound to be errors. If I stated something incorrectly, please let me know so I can learn 🙂

When executing a signed script, wintrust.dll handles validating the signature of that file. This was determined after looking at the exports. Ideally, if you take a Microsoft signed script and modify it, the integrity of the file has been compromised, and the signature should no longer be valid. Such validation is critical and fundamental to Device Guard, where its sole purpose is to prevent unsigned or untrusted code from running. CVE-2017-0007 circumvents this protection, allowing you to run any unsigned code you want by simply modifying a script that was previously signed by an approved signer. In this case, a Microsoft signed script was chosen since code signed by Microsoft needs to be able to run on Device Guard. For example, if we try to run an unsigned PowerShell script that executes restricted actions (e.g. instantiation of most COM objects), it will fail due to PowerShell being in Constrained Language mode. Any signed and trusted PowerShell code that is approved via the deployed Code Integrity Policy is permitted to run in “FullLanguage” mode, allowing it to execute with no restrictions. In this case, our code is not signed nor trusted, so it is placed in Constrained Language mode and fails to execute correctly.

Fortunately, Microsoft has scripts that are signed with their code signing certificate. You can validate that a script is indeed signed by Microsoft using sigcheck or the PowerShell cmdlet “Get-AuthenticodeSignature”. In this case, I grabbed a signed PowerShell script from the Windows SDK and renamed it to “MicrosoftSigned.ps1”:

When scripts like these are signed, they often contain an embedded authenticode signature within the body of the script. If you were to modify any contents of that file, the integrity of said file would be broken and the signature would no longer be valid. You can also simply copy the authenticode signature block from a signed file and paste it into the body of an unsigned script:

As you can see, the original contents of the script were replaced with our own code, and sigcheck reports that “The digital signature of the object did not verify”, meaning the integrity of the file has been compromised and the code will be blocked from running, right?

As you can see, our code executed anyway, despite the invalidated digital signature. Microsoft assigned this bug CVE-2017-0007, classified under MS17-012. The underlying issue here is that the error code returned by the function that ensures the file’s integrity never gets validated, resulting in successful execution of the unsigned code.

So, what is the reason for the bug, and how was it fixed? Device Guard relies on wintrust.dll to handle some of the signature and integrity checks on signed files. Due to the nature of the bug, this was the first place I looked. Bindiffing wintrust.dll pre-patch (10.0.14393.0) and post-patch (10.0.14393.953) reveals a new chunk of code was added. While there was one other change to wintrust.dll, this was the only change that pertained to validating signed scripts. Due to this, is very likely to be the patch for the bug:

Looking closer, you will see that some code from “sub_18002D0F8” was removed:

Looking at the newly added block named “sub_18002D104”, you will see that it contains some code from “sub_18002D0F8” as well as some additions. These particular functions don’t have symbols, so we must refer to them as the defined names. Alternatively, you can also rename these functions in IDA to something more meaningful.

The text above is a bit small, but I will go into depth on what exactly was done. I won’t go into specifics on using bindiff, but if you want to learn more I recommend you check out the manual. Armed with the general location of the bug fix, I set out to identify exactly what was happening when our unsigned code was executed. Knowing that some code was removed from “sub_18002D0F8” and added to a new block named “sub_18002D104” made these two places a good starting point. First, I opened up the pre-patch version of wintrust.dll (10.0.14393.0) in IDA, and navigated to the sub that was modified in the patch (sub_18002D0F8). This function starts off by setting a few variables and then calls “SoftpubAuthenticode”

Looking at “SoftpubAuthenticode” reveals that it calls another function named “CheckValidSignature”:

It makes sense that “CheckValidSignature” would handle validating the signature/integrity of the file being executed. Looking at this function, we can get the location of the last instruction before it returns.

We can see the error code from “CheckValidSignature” in the eax register by setting a windbg breakpoint at the last instruction in the function, which is highlighted in yellow above.

In this case, the error code is “0x80096010”, which translates to “TRUST_E_BAD_DIGEST”, according to wintrust.h in the Windows SDK. This is why we see “The digital signature of the object did not verify.” when running sigcheck on a modified signed file. After “CheckValidSignature” returns (via retn), we arrive back at “SoftpubAuthenticode”.

“SoftPubAuthenticode” then goes on to call “SoftpubCallUI” and then returns back to “sub_18002D0F8”, all while keeping our error code “0x80096010” in the eax register. Now that we know what the error code is and where it is stored, we can take a close look at why our script was actually allowed to run, despite “CheckValidSignature” returning “TRUST_E_BAD_DIGEST”. At this point, we are resuming execution in sub_18002D0F8, immediately after the call to “SoftpubAuthenticode”.

Since our error code is stored in eax, it gets overwritten immediately after returning from SoftpubAuthenticode via “move rax, [r12]”.

Since the error code stating that our script’s digital signature isn’t valid doesn’t exist anymore, it never gets validated and the script is allowed to execute:

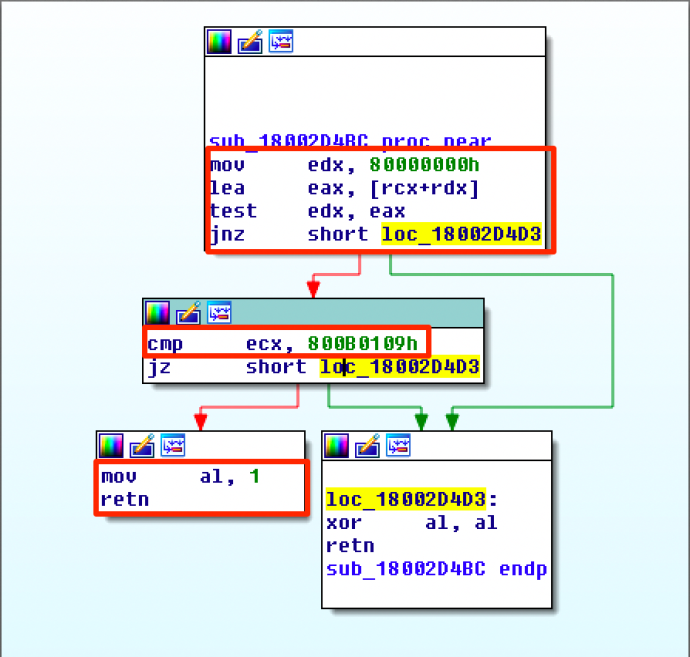
With an understanding of exactly what the bug is, we can go look at how Microsoft patched it. In order to do so, we need to install KB4013429. Looking at the new version of wintrust.dll (10.0.14393.953), we can explore “sub_18002D104”, which is the added block of code that was identified towards the beginning of the blog post. We know that the bug stemmed from the register holding our error code was being overwritten and not validated. We can see that the patch added a new call to “sub_18002D4BC” following the return from “SoftPubAuthenticode”.

You may also notice in the picture above that our error code gets placed in the ecx register, and the instructions to overwrite the rcx register is now dependent on a test instruction, followed by a “jump if zero” instruction. This means that our error code, now stored in “ecx” will only get overwritten if the jump isn’t followed. Looking at the newly introduced sub “sub_18002D4BC”, you will see this:

This function returns a BOOL (0 or 1), depending on the result of operations performed on our error code. This addition checks to see if the call to “SoftpubAuthenticode” succeeded (< 0x7FFFFFFF) or if the return code matches “0x800B0109”, which translates to “CERT_E_UNTRUSTEDROOT”. In this case, SoftpubAuthenticode returned 0x80096010 (TRUST_E_BAD_DIGEST) which does not match either of the described conditions, resulting in the function returning 1 (TRUE).

After setting “al” to “1” and returning back to the previous function, we can see how this bug was actually patched:

With “al” set to “1”, the function does another logical compare to see if “al” is zero or not. Since it isn’t, it sets the “r14b” register to “0” (since the ZF flag isn’t set from the previous “test” instruction). It then does a last logical compare to check if “r14b” is zero. Since it is, it follows the jump and skips over the portion of code that overwrites the “rcx” register (leaving ecx populated with our error code). The error code eventually gets validated and the script is placed in Constrained Language mode, causing failed execution.

Cheers,
Matt

“Fileless” UAC Bypass using sdclt.exe

Recently, I published a post on using App Paths with sdclt.exe to bypass UAC. You may remember that the App Path bypass required a file on disk. Since sdclt.exe is out there, I figured I would publish another bypass using that binary, only this one is fileless. I mentioned it in my previous post, but the Vault7 leak confirms that bypassing UAC is operationally interesting, even to nation states, as several UAC bypasses/notes were detailed in the dump. As far as public bypasses go, definitely check out the UACME project by @hfiref0x, which has a nice collection of public techniques.

In newer versions of Windows, Microsoft has shown that they are taking the bypasses seriously. This has motivated me to spend a little more time on UAC and the different methods around it.

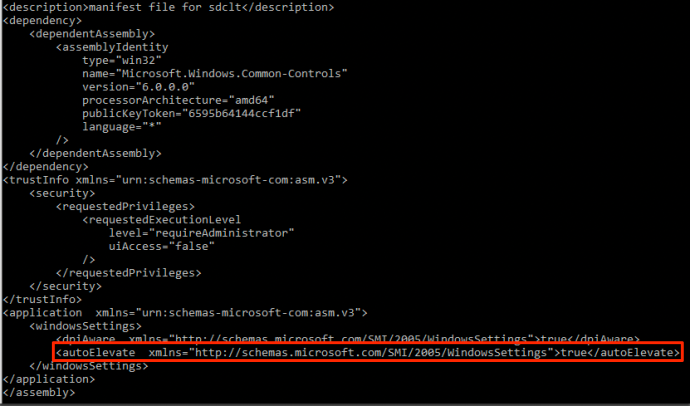
As some of you may know, there are some Microsoft signed binaries that auto-elevate due to their manifest. You can read more about these binaries and their manifests here. While searching for more of these auto-elevating binaries by using the SysInternals tool “sigcheck“, I came across “sdclt.exe” and verified that it auto-elevates due to its manifest:

*Note: This only works on Windows 10. The manifest for sdclt.exe in Windows 7 has the requestedExecutionLevel set to “AsInvoker”, preventing auto-elevation when started from medium integrity.

As I mentioned in my last post, a common technique used to investigate loading behavior on Windows is to use SysInternals Process Monitor to analyze how a process behaves when executed. I often work some basic binary analysis into my investigative process in order to see what other opportunities exist.

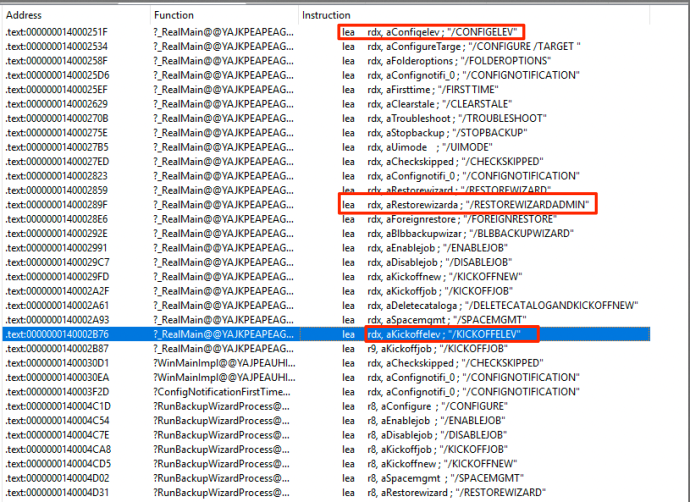
One of the first things I tend to do when analyzing an auto-elevate binary is to look for any potential command line arguments. I use IDA for this, but you can use your preferred tool. When peering into sdclt.exe, I noticed a few arguments that stood out due to interesting keywords:

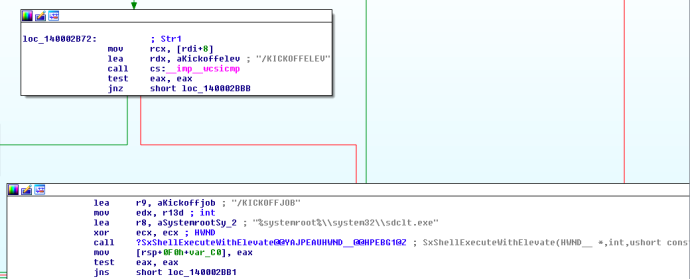
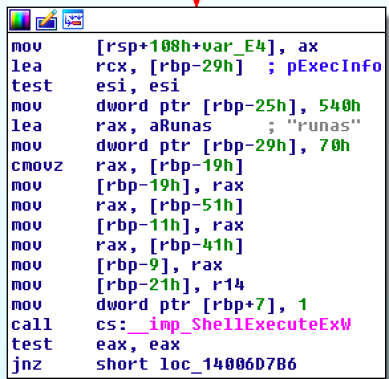
These were interesting as sdclt.exe is set to auto-elevate in its manifest anyway. Looking at sdclt.exe in IDA, it checks if the argument matches “/kickoffelev”. If it does, it sets the full path for “sdclt.exe”, adds “/KickOffJob” as a parameter and then calls SxShellExecuteWithElevate.

Following that path, SxShellExecuteWithElevate starts “%systemroot%\system32\sdclt.exe /kickoffjob” with the “Runas” verb. This is essentially programmatically executing the “RunAsAdministrator” option when you right-click a binary.

The next step is to run “sdclt.exe /Kickoffelev” with procmon running. After going through the output, we see the trusty “shell\<verb>\command” registry search path in the HKEY_CURRENT_USER hive.

The next step was to add those keys and see if our binary and parameters of choice would execute. Unfortunately, nothing executed after adding the keys and starting “sdclt.exe /kickoffelev”. Looking back in procmon, our keys are queried, but sdclt.exe is actually looking for an additional value within the “command” key: “IsolatedCommand”.

We can then add our payload and parameters in a string (REG_SZ) value within the “Command” key called “IsolatedCommand”:

This is the same bug (minus the IsolatedCommand portion) that was used in the eventvwr.exe “fileless” UAC bypass. You can read about the eventvwr.exe bypass and the specific registry keys used here. Notice that instead of “shell\open\command”, we now see “shell\runas\command”. This is because sdclt.exe was invoked (again) using the “RunAs” verb via SxShellExecuteWithElevate.

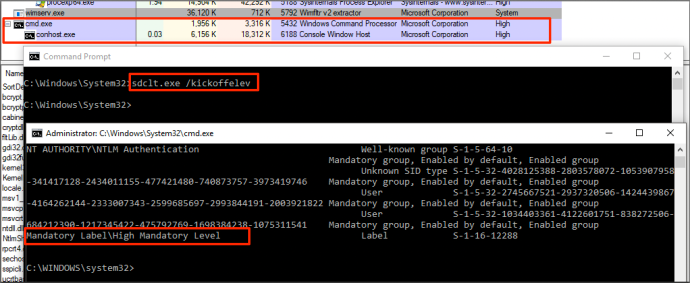
After adding our payload as the “IsolatedCommand” value, running “sdclt.exe /KickOffElev” will execute our payload (and any parameters) in a high-integrity context:

To demonstrate this technique, you can find a script here: https://github.com/enigma0x3/Misc-PowerShell-Stuff/blob/master/Invoke-SDCLTBypass.ps1

The script takes a full path to your payload and any parameters. “C:\Windows\System32\cmd.exe /c notepad.exe” is a good one to validate. It will automatically add the keys, start “sdclt.exe /kickoffelev” and then cleanup.

This particular technique can be remediated or fixed by setting the UAC level to “Always Notify” or by removing the current user from the Local Administrators group. Further, if you would like to monitor for this attack, you could utilize methods/signatures to look for and alert on new registry entries in HKCU:\Software\Classes\exefile\shell\runas\command\isolatedCommand

Cheers,
Matt